Hypercore is a secure, distributed append-only log which I have been following since the days of Dat.
I was recently exploring the datastrcutures that can be implemented over Hypercore and came up with a few. I will be exploring them in a series of posts.
In this post, we will see the representation of a stack with diagrams representing the state after each step of a series of operations.
Each rectangle represents a block in the Hypercore. The number above it represents the block number. Hypercore allows blocks to be only added. So the block number increases monotonically. Also, there is no way to remove a block. So You will see the total Hypercore size increases as we progress.
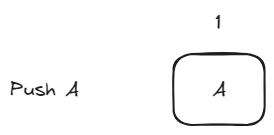
Step 1
The initial state is an empty Hypercore which represents an empty stack.
On pushing an element into the stack, we ad a new block with the element added.
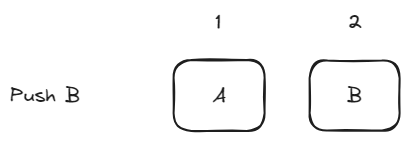
Step 2
Now we push another.
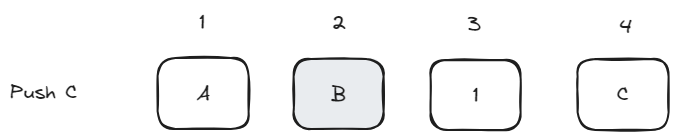
Step 3
Now we want to pop the top element. Till now, the top element of the stack has been the the last block in the Hypercore, but now need to change the top of the stack. We do this by writing the block number of the top element as a new block.

Till now a block had only the contents of the stack. Now we have an additional data type that a block can hold which is the block number of the top element or a pointer to the top. So you might need a type field as the first byte of the block in your implementation, but we skip it for simplicity as our block contents are always an alphabet.
Also, the block number 2 is shown in gray as any further operations will never access block number 2. This enables sparse download of the Hypercore for an new comer or garbage collection of unused blocks for an existing user.
Step 4
Next we push a new element C. We once again do this by appending a new block with the element.
Step 5
Now we want to pop an element from the stack. Since the last block contains the element directly and is not a pointer we directly read the value of the top. Now we need to append a block to the Hypercore with the block number of the previous element in the stack. We do this by looking at the previous block and if it is an element, we write its block number as the new top. If instead it is a pointer we write that as the new top. In this case, we write the pointer value 1.

Step 6
Now a final pop to empty the stack.

We read the element A using the top pointer in the last block. Since there is no previous block, we write the value 0 as the pointer to the top by appending a new block. You will see that, now the beginning part of the Hypercore never needs to be downloaded by new users who are interested only in the latest state.
Step 7
Now we will see how the stack looks with a new element inserted after the stack has been emptied.

I hope this figure is now self explanatory. You can find the code I have used at experiment-hypercore/stack.js
In this next post, I explore how we can implement a queue on a hypercore.